Want to start using photogrammetry with a movie clip? Then I think you will want to hear about this.
Introduction
PFTrack is at the forefront of using photogrammetry to assist with the matchmoving, tracking and layout processes. Having such a rich dataset to work within VFX and other related industries can be hugely advantageous… but how can that be achieved using a movie clip when a photo dataset isn’t available?
So I don’t need a set of photo stills !?
Quite simply, no! One of the major benefits of PFTrack is that you don’t have to have a set of dedicated stills alongside your clip to benefit from the Photogrammetry pipeline.

Even better, in PFTrack, we have made it so easy to use photogrammetry with a movie clip, and you really don’t need photogrammetry experience to take advantage of it. If you’re working with a single clip, we have put together a list of tips to help you get started with your own.
Using your movie clip
A good set of photographs is essential to ensure the best results in many photogrammetry applications. So how do you know the difference between a good or bad set of photos?
There are no set rules, and requirements will differ between different manufacturers, but you need to shoot enough photos to ensure good coverage of your scene as a rule of thumb. However, the drawback is that shooting too many photos can often result in very long (and unnecessary) processing times. Additionally, you can’t always be sure you’ve captured everything you need, so the temptation is to throw absolutely everything at it, including the kitchen sink, in the hope that the final result is what you’re after.
PFTrack provides a node that makes this task a lot easier while, in many cases, using the shot you have been handed to track: Load your movie clip into the Select Frames node, and it will automatically pick out a set of frames to use for photogrammetry.

Hint: If you’ve already used PFTrack’s matchmoving tools to track your movie camera, then you can pipe the result directly into the Select Frames node and start building a model of your scene immediately.
Less is more..?
As mentioned previously, photogrammetry can take a long time to process if you’ve captured lots of photos. With the Select Frames node in PFTrack, you can actually do a lot with a little: PFTrack will pick out the best set of candidate frames from your movie clip to cover your scene without the need to process every frame. If you’ve got a movie clip with thousands of frames, then this will speed things up dramatically!
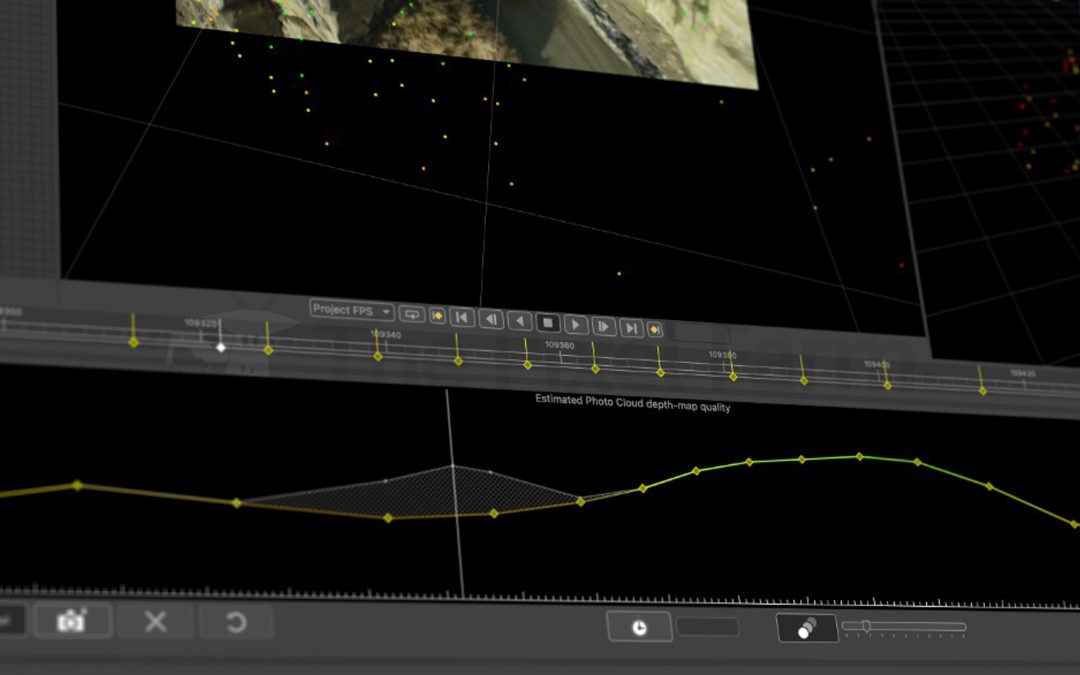
Additionally, if you have already tracked and solved your movie camera using PFTrack’s matchmoving tools, you can automatically select your frames using the camera motion, which will select more frames where the camera’s motion is at its highest and less where the camera is barely changing position. Using the pre-calculated camera path creates the best chance of getting good coverage of the area of interest, ensuring enough overlap between each frame. You can even get some visual feedback on how well your frames are matched and how much coverage you will have before starting your photogrammetry solvers.

PFTrack can also select frames using a regular time-sampling period without having tracked your camera first. You can increase or decrease the time increment to add or remove more frames and even switch into manual mode to insert frames yourself. This is incredibly powerful as it allows us to insert frames with precision without resorting to adding in a whole bunch of frames unnecessarily to get the coverage we need, thereby reducing the load and time spent processing.

More Movie Clips!
Once you’ve started with PFTrack’s photogrammetry tools, it’s straightforward to add additional movie clips into the same scene using the Match Camera node. PFTrack will automatically locate each movie camera into the scene you’ve captured using your initial photos — no need to scale or orient each shot manually.

Tips to get better results
Metadata
When shooting photographs with a digital camera, the camera records a lot of useful information, such as the camera sensor size and focal length and stores it in each photo as EXIF metadata. This information will play a big part in how accurately the camera’s position is plotted in the 3D scene.
This is no different when using a movie clip shot on recent digital cinema cameras. PFTrack currently supports embedded metadata via ARRIRAW and REDCODE. You can capitalise on the rich metadata both formats provide on the camera back and attached lenses such as Cooke’s iData, Arri’s LDS system and Zeiss eXtended data.
Using the camera embedded metadata provides incredibly accurate per frame camera metrics that make tracking shots a breeze, even those shot with variable focal lengths. More and more VFX companies are starting to embrace these extended metadata pipelines. However, it is still often the case that specific VFX pipelines remove this metadata. If it is the case the metadata has been stripped from your movie file, entering the information by hand will be required. If this is the case, be extra vigilant and ensure you have the correct information to hand to enter.

Focal length can be a tricky one to determine. If there is no metadata to help you, then the information might be inside a camera log or report and maybe even on a slate at the top or tail of a shot. Failing that, if it’s a prime lens, then they will normally come in standard lengths, 12mm, 14mm, 18mm, 25mm, 28mm, 35mm, 40mm, 50mm, 65mm, 75mm, 100mm, and 135mm, between 28mm > 50mm being the most commonly used, this should help narrow down the decision. You could use the estimated focal length node to figure out the focal length using two or more vanishing points.
Along with the sensor size and focal length, distortion can also have a big impact on the accuracy of your results. While PFTrack can automatically correct for lens distortions, you can also manually measure distortion for your movie clip in the Clip Input node, or even better — shoot a lens distortion grid and build a camera preset for the best results.
Motion Blur
While both these selected frames below have been taken from the same section and appear to look like they will provide us with what we need, one image is actually a better candidate than the other. If you take a closer look, you will observe the frame on the right is significantly more motion blurred than the one on the left. When we consider that our goal is to match points from one image to another, motion blur reduces the number of detected feature points and affects the photogrammetric processes’ quality. This is why it is important where possible to use clips without any motion blur if possible.

Shallow focus
Every clip we extract images from in an ideal world will have a high T-stop, and the image will be all in focus. When we take photographs to use for photogrammetry processing, this is something that we can control. However, when we extract images from sequences shot with a cinema camera, depth of field and focus are often used creatively to shift the audience’s attention to specific areas of the image. This doesn’t work out so well if we are trying to use these images for photogrammetry. As with motion blur, the result limits the number of feature points that can be detected and matched between frames.

Having said that, we only need a handful of frames covering our area of interest to start building a meaningful photogrammetry dataset. Therefore, it’s worth checking the frames over the entire duration of the shot, as even if the focus has shifted from an area of interest within a frame, other frames may have the detail you need.
Moving objects and reflections
Every clip we extract images from in an ideal world will have a high T-stop, and the image will be all in focus. When we take photographs to use for photogrammetry processing, this is something that we can control. However, when we extract images from sequences shot with a cinema camera, depth of field and focus are often used creatively to shift the audience’s attention to specific areas of the image. This doesn’t work out so well if we are trying to use these images for photogrammetry. As with motion blur, the result limits the number of feature points that can be detected and matched between frames.